Showing posts with label Pinterest. Show all posts

Friday, April 24, 2015

U is for Upcycled


I mentioned yesterday that today's post for the A to Z Challenge would be a bit of a cheat. But I also promised it would be a good one.

It's been a really rough week full of Mondays and we have a lot going on around here so my planned project for U just didn't happen. Luckily, I had this little gem from last year that I was able to bring out just in time.

Today, U is for upcycled. It's a kiddie kitchenette upcycled from an old entertainment center. (I suppose technically, it's also an upcycled post...upcycled from 2014's L post to 2015's U post.)

I was going to put the effort in and restructure the post for this year, but I'm wiped. I'm taking the mulligan on this one and hoping my energy returns for tomorrow's post. Luckily, that one has been long done and just needs a post written around the photos. Until then...here's my awesome cheat project.

Okay...this has to be one of my most favorite projects ever. I loved this one. It took FOR-E-VER, but I loved it. Even better? I made the whole thing for about $40. Yup...$40.


It all started when I found this entertainment unit at a thrift store for $20. It had some issues, but I knew I wanted it. You see...I had seen things on Pinterest. Ah, it's always the Pinterest.

I saw this picture of a little nightstand turned into a kitchen and I was hooked.

It took some work, but I tracked this down to the original designer.
It was made by Miranda Walker over at Narrating Life.
With the mental images of all the possibilities tumbling through my head, I moved forward like a woman possessed. I was obsessed with this project. 

I had decided to make it for Miss Marley for her 2nd birthday. And that was it. It was time to get to work.


I picked out my paint colors, wanting something bright and cheerful. I wound up selecting Iris Plum and Tropical Green from the Clark & Kensington series.


I happened upon a commercial for ACE Hardware just about the time I was getting ready to start this project. You see, Clark & Kensington does a promotion about twice a year where you can get free paint. Yes...FREE. So I was able to get a sample quart of each color for my project. Cost = $0. Awesome.


And then the dismantling began. I drew up some loose plans and removed non-frame pieces from the original cabinet. All of the hardware, doors, and shelving came off. Then I sanded all the things. So. Much. Sanding. It was everywhere.

Collin helped me out here and we cut a section out to fit the "sink". The sink is actually a metal mixing bowl that I got from another thrift store for all of $0.50. The sink was fitted and attached with epoxy.


I started painting. I had gone back and forth with where I wanted the green and where I wanted the purple. In the end, I just flew by the seat of my pants. Oh...and don't mind the messy garage in these photos.


Doors got painted green and cabinets started getting attached.


I discarded the original glass door and instead sectioned a shelf to create a fridge and freezer. They open separately. The handles I got in a bag of about ten from a thrift store for $2.


I sliced another door in half so that I had a microwave and used a separate shelf to create an oven. These pieces were painted black and then had a screen area of gray painted on. I also made the buttons. I used my printer to make these on photo paper, printed them, cut them out, adhered them with my sticker maker and then Mod Podged the crap out of them. LOTS of painting and coating was involved in this step.


I wanted everything decorated and homey. I got more kitchen parts from the thrift store (a faucet, some stove knobs, a towel rack) and then added a leftover dowel from one of our upstairs closets and a set of small hooks that I had from who knows where. The faucet knobs and the stove top knobs all turn.

The stove is my least favorite part, but it turned out okay. I painted a square section white and then added black spirals for the burners.

I found some cute fabric on sale at JoAnn Fabric and sewed myself some curtains and a dish towel.


This piece was a somewhat last minute add on. The piece that I used for a set of standing shelves was actually a media divider in the bottom drawer of the original unit. I bolted this to the side of my kitchen and created a chalkboard above it using black chalkboard paint.


Hinges were added to the microwave, the door below the microwave, and the oven. Handles were added to the microwave and oven doors.


And then we delivered the kitchen to Miss Marley on her birthday. Her favorite part was the buttons on the microwave. She sat there for at least five minutes saying "beep, boop, beep" and punching buttons.

(2015 Note: Miss Marley is now 4 and her little brother is the age she was when we took these pictures. She's still adorable, just sassier.)


She quickly busted out her grocery cart and supplies and stocked her kitchen. She loved that the knobs turned.


She set to work making meals for everyone there.


I was super glad to finally have the project finished after months of work and I was even happier that she loved it so much.


Cost:

Unit: $20
Paint: $0
"Sink": $0.50
Door Handles: $2 (with a pile to spare)
Oven Handle: $2
Stove Knobs: $1
Faucet: $3
Towel Rack: $1
Fabric: $3 (with about 1/2 yard to spare)
Chalkboard Paint: $2
Hinges: $5

Total Cost: $39.50. Boom! Under $40. Not. Too. Shabby. And I still love it oh so much.

Miss any of my A to Z posts so far this year? Find them below...

1. A is for Anna (Easy Anna Cape)
2. B is for Bath (Appliqued Bath Mat)
3. C is for Child (Children's Growth Ruler)
4. D is for Denim (Denim Bib)
5. E is for Etch (Etched Casserole Dishes)
6. F is for Felt (Felt Hopscotch Mat)
7. G is for Good Night ("Good Night" Envelope Pillows)
8. H is for Hood (Easy Hooded Towel)
9. I is for Insulated (Insulated Beverage Cozies)
10. J is for Jumper (Embroidered Spring Jumper)
11. K is for Know (Know When to Hold 'Em/Fold 'Em Laundry Sign)
12. L is for Loveseat (Envelope Loveseat Pillows)
13. M is for Mittens (Fleece Baby Mittens)
14. N is for Ninja Turtle (Felt Ninja Turtle)
15. O is for Owl (Owl Stuffies)
16. P is for Princess (Princess Peg Dolls)
17. Q is for Quilt (Moustache Quilt)
18. R is for Reading (Appliqued Reading Pillow)
19. S is for Superheroes (Superhero Peg Dolls)
20. T is for Tumblers (Custom Etched Barware)

Are you visiting from A to Z?

Be sure to leave me a comment (including your blog link) so I can come over and return the favor!


Saturday, April 11, 2015

J is for Jumper


We've made it all the way to J and we're wrapping up week two of the Blogging from A to Z Challenge. I'm still amazed at how quickly this makes the month go.

Today, J is for Jumper. I'm pretty proud of this one...for a couple of reasons.

1. It's the first item of clothing I've sewn from scratch that wasn't purely for dress up.
2. It's the first item of clothing I've sewn with a proper liner.
3. It's sewn from my own hodgepodge of three different patterns. Per usual, I can't just follow instructions, I have to do things my own way.


The idea for this project initially started with Butterick pattern B5914. I was looking at making the dress for pattern D. How cute are those little ruffles? But...I have little patience for patterns and I had a little girl who needed a present for her 4th birthday. I wasn't wrestling it.

I was working on making her the Anna Cape I shared earlier in the A to Z when I thought about making her an Anna jumper to go with it instead. I just happened to have a tutorial for one from Snugglebug University pinned to one of my Pinterest boards, so I went out and tracked that down...

This is where indecisiveness took over. I got sucked into the Pinterest boards and got mesmerized by the cute little Kitty Skirt from Flamingo Toes.

What's a girl to do? Well...combine all three, of course! I took Snugglebug's pattern and tweaked it to more closely resemble the Butterick pattern (totally ignoring the actual pattern pieces and focusing on the photo on the pattern instead...because I'm crazy like that).


I snagged a little bit of felt I had hanging around and cut myself out a little kitty cat like the one from Flamingo Toes. I embroidered a face on him and used a couple of metal brads for some shiny eyes.

He was later stitched on by hand because I'm occasionally a little special and I sewed the lining in before I realized that his cute little face was still staring up at me from the sewing table. Drat. Good thing I can work a whip stitch.


I used two different patterns of fabric for the dress. I had about a yard of the gray/pink fabric and just a fat quarter of the plain pink. I debated a few different ways to make it and ended up creating a bodice in the pink with grey/pink flutter sleeves and then the jumper skirt out of the gray/pink fabric.


I made a simple bodice lining using some satiny white fabric I had actually initially purchased in order to make the nieces some Elsa dresses. (Funny how Frozen just keeps coming back in this project.) I still have enough to make the dresses, but it gave me a bonus project as well.

There may or may not have been a TON of turquoise glitter stuck to it from other Elsa bound fabrics that gave me a slight headache...


It's a pullover jumper, so there wasn't a zipper to wrestle with, thank goodness. Once I finished the whole thing, I kind of regretted not adding a sewn-in sash to aid in adding waist adjustment possibilities, but I'm still pretty happy with how it turned out.

Since I totally flew by the seat of my pants making it, I don't really have a step-by-step tutorial, but I did keep my fabricated pattern pieces, so I should be able to make another. Perhaps then I'll share the actual detailed way I managed to put this all together.

The only change I need to make is in the shoulder straps. They were initially too long so I need to shorten them up a bit in round two. I ended up having to hem these ones a little bit once I was all done.


I think this has been my favorite project to share so far. I'm excited about a few others I have coming up, as well. Nothing this year will be quite as involved as my L is for Little Kitchen post last year, but I will tell you that I'm pretty excited for P, S & V in particular. You'll get to see P next Saturday!

Now...I'm going to take my Sunday off and get some stuff ready for letters K through P. I should probably finish making M & N or next week will be a little empty...

Miss any of my A to Z posts so far this year?

1. A is for Anna (Easy Anna Cape)
2. B is for Bath (Appliqued Bath Mat)
3. C is for Child (Children's Growth Ruler)
4. D is for Denim (Denim Bib)
5. E is for Etch (Etched Casserole Dishes)
6. F is for Felt (Felt Hopscotch Mat)
7. G is for Good Night ("Good Night" Envelope Pillows)
8. H is for Hood (Easy Hooded Towel)
9. I is for Insulated (Insulated Beverage Cozies)

Are you visiting from A to Z? 

Be sure to leave me a comment (including your blog link) so I can come over and return the favor!

Have a wonderful rest of your weekend and I will see you again on Monday with letter K!

Wednesday, April 8, 2015

G is for Good Night


We're moving right along with the A to Z Challenge! It's "G" day today and I'm sharing a pair of "Good Night" pillows that I made for my sister-in-law.

These were really fun to make and were my first foray into pillow making. I now feel pretty comfortable making envelope pillows in any shape and size. It's a bit of a long tutorial, but I promise they're a pretty easy project.

I really like pillows. Like...a lot. I have an entire Pinterest board dedicated to them. It's a little sad, really. In fact, there will be two more projects in the A to Z based on pillows...you'll see them for letters L and R. So if this isn't enough of a tutorial for you and you want some more instructions and/or options, those will be your go to posts.

These particular pillows were inspired by a pinned post from Leslie at The Seasoned Homemaker. She has some really fun stuff over on her site and I thought these would just be perfect for a nice fluffy bed.


To get started, you'll need:

Pillows. I used 2 - 16x16" pillows, but you can do this in any shape and/or size.

Fabric for your pillows. I chose to do a solid on one side and a pattern on the other.

Fabric or vinyl for your lettering. I used heat transfer stripflock vinyl from Expressions Vinyl that had a nice fuzzy texture.

Piping (optional)


Start out by cutting your lettering. It's a little hard to see in the photo above, but I did this with my Pazzle.

The flocked vinyl comes in three layers. The bottom layer is the backing for the adhesive, the middle layer is your vinyl, and the top layer is a protective sheet to keep your flocking from being destroyed.

Peel off the protective sheet after you've adhered your vinyl to the cutting mat. Leave the adhesive backing on for this stage.


After the wording has been cut, place transfer tape over the tops of your words to make moving them off the adhesive sheet easier and to help keep your letters nice and lined up. Set your vinyl aside for now.


It's time to cut your pillows out. Make sure you wash and press your fabrics first. Yes...they look a little wrinkly in my photo above. I promise they really were pressed...they'll look nicer in a minute. The picture above and the next couple of pictures were actually stolen from letter L's post since I forgot to take pics of these steps during the fabrication of these particular pillows. Oops.

The square for the front of your pillow should be 1" taller and 1" wider than the measurement of your pillow. So I had two 17 x 17" squares of the green fabric for my pillows.

The rectangle for the back of the pillow will be 1" taller and 5" wider than your pillow. For me, that meant two 17 x 21" patterned rectangles.

If you use a larger seam allowance than 1/4" or you have extra fluffy pillows, add an extra inch onto these measurements in each direction.


Cut your backing rectangle in half. In my case, each rectangle became two 17" x 10.5" rectangles.


Create a nice edge for each rectangle by folding one edge in by 1/4", pressing, and folding another 1/4". Press again. Once you have these seams, stitch them down. These two seams will be where your envelope comes together in the back for the insertion of your pillow.


Now you can peel your vinyl from the adhesive backing using the transfer tape. Weed out all of the excess pieces in between your lettering (you can see that the "g" in "good" hasn't yet been weeded in the above picture).


Flip your sheets over and line up your wording on each pillow. Press the wording on to the fabric and gently remove your transfer tape. Press with a heated iron (you'll want the highest heat your base fabric can handle, use a towel on top as needed). Press for 20-30 seconds.

(Interjection here... This step should make the adhesion permanent. However...I learned this weekend that that may not be the case. Apparently chocolate labs are capable of removing an "n" with their toenails. No worries, it should be able to be readhered with some applied heat. Apparently my fusion wasn't complete the first run through. You can always applique the letters on by stitching around the edges if you're concerned about keeping the lettering on extra tight.)


Once your lettering is on, sew your pillows. I will be going over these steps more in depth in the letter "L" post, but basically, you'll create French seams.

Layer and pin the fabrics together as they would be seen in the final project (piping sandwiched in between fronts and backs). Stitch around the edges, then flip the whole thing inside out. Repin around the edges (feeling for the piping and pinning as close to its base as possible) and stitch again.

Flip it back right side out and you have your finished product!


Now you can slip your pillow in through the envelope opening in the back and you're all ready to plop these little babies on your bed, or chair, or sofa. When the pillow starts to go flat, just swap it out. Easy peasy.


Miss any of my A to Z posts so far this year?

1. A is for Anna (Easy Anna Cape)
2. B is for Bath (Appliqued Bath Mat)
3. C is for Child (Children's Growth Ruler)
4. D is for Denim (Denim Bib)
5. E is for Etch (Etched Casserole Dishes)
6. F is for Felt (Felt Hopscotch Mat)

Are you visiting from A to Z? 

Be sure to leave me a comment so I can come over and return the favor!

I'll see you back here again tomorrow for letter H.

Saturday, April 4, 2015

D is for Denim


I always enjoy sewing things for the kiddos. Most of the time I go for the fun stuff, but sometimes you need to mix the fun with the practical.

Denim bibs are practical, nice and sturdy, but they don't have to be boring.

For this project, I used the Monster Bib template from Carolynn over at Fab N' Free as my base pattern. (I made a couple of her Monster Bibs a while back and they are just freaking cute.)

I bought my monster fabric because it reminded me so much of Monsters, Inc., one of my favorite Disney movies. Just a cute, bright, and fun pattern!


I went a little different direction on this version of the denim monster bib. I cut the bottom half of the pattern from denim and the top straps from my monster fabric just to mix things up. I cut a separate strip from the monster fabric for my center "pop" of color and pattern.


I stitched my pieces together and added my center strip on top of the main denim piece with a little zigzag stitching for decoration.

After that, I put the two right sides of the front and back together and stitched 3/4 of the way around the edge, leaving about 3" open along the bottom of the bib.

I flipped the bib back right side out, folded in my unfinished edge, and top stitched the whole thing with a bright orange zigzag stitch.

After that, I just stitched on some velcro circles at the top flaps of the bib and my denim monster bib was ready to go!


I really like how this one turned out. A good stepping stone for developing some new bib pattern ideas.

I've made it through week one of the A to Z! Things kick back up again on Monday with letter E.

Miss any of my A to Z posts so far this year?

1. A is for Anna (Easy Anna Cape)
2. B is for Bath (Appliqued Bath Mat)
3. C is for Child (Children's Growth Ruler)

Are you visiting from A to Z? 

Be sure to leave me a comment so I can come return the favor. There are some great participants out there this year!!

Friday, April 3, 2015

C is for Children


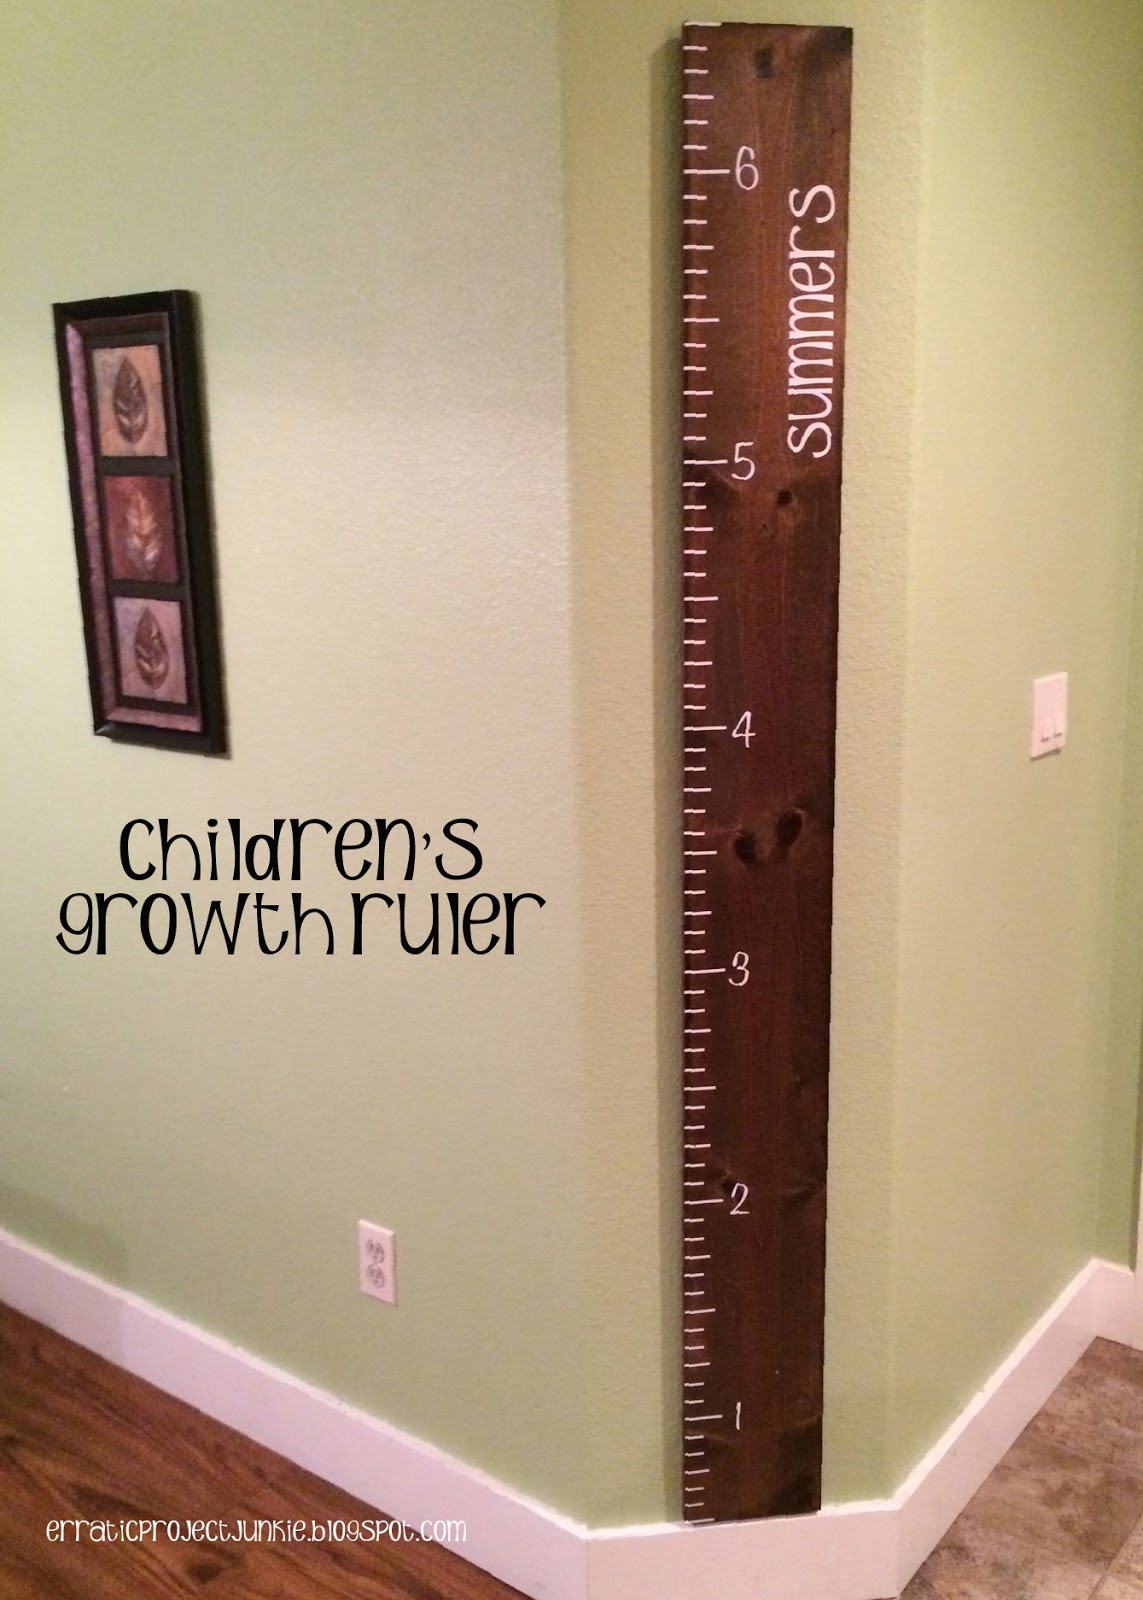
It's day 3 of A to Z...that means that letter C is up. If you're on Pinterest, you've probably seen at least one of these pop up in your feed. DIY Child Growth Rulers are becoming a pretty popular trend. I've noticed though that a lot of them don't link up to any sort of tutorial...it's all just photos. Today, I fix that.

These were made for Christmas presents, so I kind of worked in assembly line fashion. I started out with 4 pine boards from Home Depot. Each board was 6 feet long and 8" wide. The 6" wide ones are cheaper and will still get the job done, but I wanted a board that looked good and sturdy.


I stained each board (on both sides) with 2-3 coats of MinWax Wood Finish in Provincial 211. This gave a semi-dark stain, but still allowed the grain of the boards to come through well.


A lot of time was spent staining and drying, flipping, staining and drying. Just getting this phase done took several days. Be patient... Oh...and don't expect perfection. The stain will have some "character".


Once the stained boards were ready to roll, I adhered vinyl lettering (last names) and numbers along with ruler hash marks. I cut all of my vinyl pieces out using my Pazzle (similar to a Cricut or Silhouette). I used indoor vinyl, but would use outdoor vinyl if I was to do this project again. The indoor tends to get a little finicky and I did have a little peel up on a few of the hash marks.

Marks were started at 6" and went all the way up to 6 1/2 feet. Starting at 6" was not an accident...you'll see why shortly.


Once all of the vinyl was adhered, I let the vinyl "cure" over night. I then coated each board with clearcoat. You could also use ModPodge, but I wasn't wanting to brush ModPodge on for days. Instead, I settled for 3 coats of clearcoat over a day and a half.


The 6" at the bottom was designed to allow room for moulding. The one above was for my sister-in-law's family. As you can see, it was just the right height for their 6" base boards.

Heights for multiple children can be added. A white or silver sharpie works well to show up on the board surface.

A mildly time-consuming project, but technically simple and a perfect decorating piece for those with young kids.

I hope your A to Z is going swimmingly! One more this week: D is up tomorrow!


Did you miss any of my previous A to Z posts?

1. A is for Anna (Easy Anna Cape)
2. B is for Bath (Appliqued Bath Mat)

Wednesday, April 1, 2015

A is for Anna


Happy April Fools' Day everyone! It's day one of the 2015 A to Z Challenge...are you ready for a crazy month?


The A to Z Challenge is a blogging event where bloggers gather to create nearly daily posts throughout the month of April. We start on April 1st with letter A and then continue through the month until we end on Z, taking Sundays off for good behavior.

There are over 1,100 participating bloggers this year. Wow! I'm in my second year of participation. I had such a great time last year, that I've been excited to get this ball rolling. I won't lie though, with my schedule being as ridiculous as it is, I'm a little scared for the month. Here's hoping I can make it!

We're starting off with a sewing project...one of many. If you have a girl between the ages of 2 and 12 in your home, then you've probably been hit sometime in the last couple of years with the Frozen craze. We have two nieces who are totally in love with all things Frozen, so obviously, A is very much for Anna.

I started with Cindy's no-sew version over at Skip to My Lou to give myself a brief pattern jump start.

I used:

2 yd. felt
2 yd. PomPom trim
1 yd. coordinating ribbon

How I Did It:


I followed Cindy's cape pattern to get myself started. This was really straightforward and only took me about 15 minutes.

Start by folding your felt horizontally, leaving your fold on the right hand side. Bring the top left corner down to meet the fold at about 3/4 of the way down.


Flip your felt upside down and repeat the fold process, pulling your top left corner about 1/2 of the way down the length of the felt. You should end up with a layered cone like the one above. This will give you your basic cape shape.


Slice off the bottom of the felt in a gentle arc about 1/2 way down the entire length. The top piece will be your cape body.


Undo one of the folds. Repeat the curve cut with the top of your cape to create the neck hole. You can sew your ribbon directly to this piece and be done, or you can continue on adding the capelet and fringe.

I flew by the seat of my pants to make my capelet, but Cindy has good directions on hers. I cut a general shape to match my cape and then sewed my Pom Pom fringe along the edges. With that done, I placed the outside of the capelet against the inside of the main cape and laid my ribbon along the matched up edge. I got everything lined up pretty, pinned it, and stitched the three layers together. After that, it was just a simple flip of the capelet...and voila! Anna cape!

It still looked a little plain to me, so I added some decorative stitching around the edges of the main cape parcel.


We had a pretty happy 4-year-old on our hands.


This might possibly be the easiest cape pattern I've ever used. Cindy knows her stuff. I will definitely be using this one again.

Now...one of these days I need to get brave and make an Elsa dress...


Are you participating in the A-to-Z Challenge? Leave me a comment to let me know you've visited! I'll be making the rounds throughout the month, but I definitely want to return the favor for anyone who takes the time to stop by.

Next up... B...

Other Posts You Might LIke

Related Posts Plugin for WordPress, Blogger...
01 09 10 11 12
Blogging tips