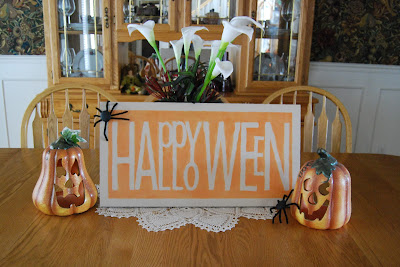
The idea came from a Flickr photo I found on Pinterest. It wasn't hooked to a blog and it had the appearance of being something that was being sold rather than a tutorial, so I just decided that I would wing it and do it on my own.
I started with a leftover shelf from some cabinets at the office. Mistake number one occurred right at the start. I completely forgot to sand the shelf before I painted it. And since I was using latex paint...I peeled up the whole darned thing right before I had it done. So...step one...sand your shelf.
I painted the whole thing in a coat of paint that actually matches the walls in our house. We have a huge stash of every color for touch ups, so I figured that I would finally put it to use.
Once the board was dry, I marked it out with painter's tape to give a bit of a border. I cut out the letters for the "Happy Halloween" using my Pazzle (where you can merge shapes...that's how the p/l, y/o, and the double e were created. I took the cut out pieces and made them into post it notes using my Wacky Tac (which you can actually see in the photo...it's the yellow bottle in the center).
With everything secured down, I painted over the top using a mixture of acrylic paints. The pumpkin orange color I had was far too bright, so I toned it down by mixing it with some desert beige.
I let the paint dry for a bit and then peeled up the tape and the post it letters. There were a few leaks, so I went back and touched up the letters by hand.
This is where mistake number two occurred. Here is the lesson to be learned...test out your product on something else before you move ahead. I had some crackle paint that had been sitting around for a while. I decided that it would be a good idea to use that to add some distressed look. Well...it added some distress alright, it also added some stress. I soon realized that the stuff did not dry clear. It murked up everything.
 |
| Mid-dry. You can kind of see the orange. It got slightly better than this, but not by much. |
But...in the end it turned out alright. I placed it on the dining room table, adorned with a couple of the simple stone spiders I made a little while back. I think I'll keep it.
This post is part of a series. To read the other posts, click here.


It's one of those projects where you say, through gritted teeth, "I AM going to win this, dammit!!" ha It turned out nice!
ReplyDelete