
It's day 3 of the A-to-Z Challenge. Things are going pretty swimmingly so far. Today's letter is...

In EPJ land, C is always for coaster. I've become somewhat famous (or maybe notorious) among my family and friends for my coasters. My bottlecap coasters are one of the most popular posts on the blog. Even two years later, it still gets one of the highest number of visitors each week. Crazy.
But today is not about bottlecap coasters. It's a different kind of upcycling. I'm all about reusing stuff for my crafts so I don't have to go out and buy anything. It's called frugal, people...it's not hoarding. Okay...maybe it's a little bit of hoarding. The crop room closet is a mess...I'll admit it.
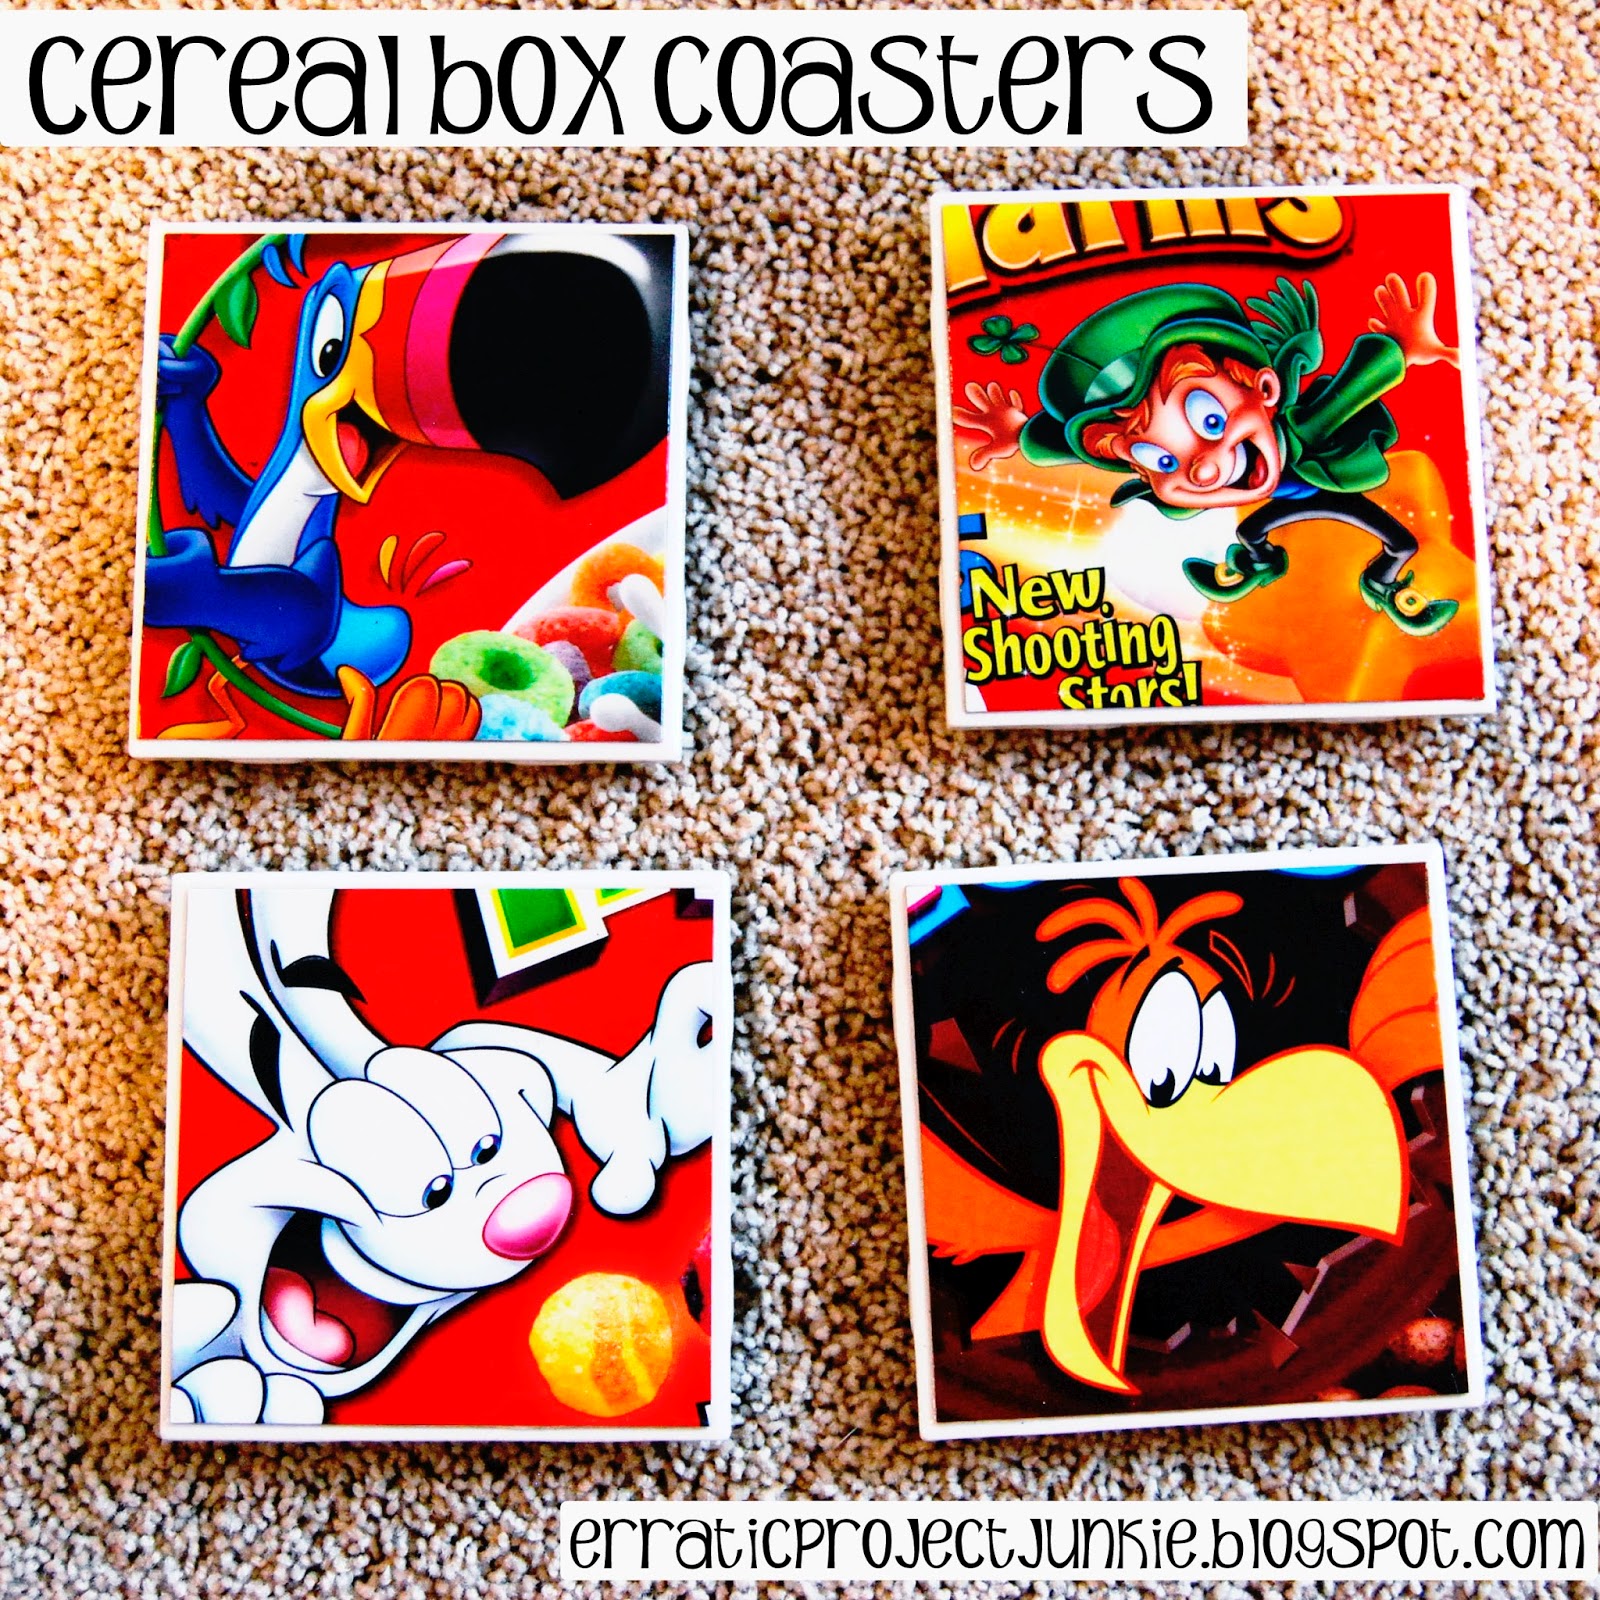
A couple of years ago, I had the boys start saving our cereal boxes. I didn't have a plan for them at the time, but I figured they would come in handy for something. I thought maybe I'd use them to make magazine holder style boxes. I didn't think I'd use them like this. Sometimes ideas just work out.

Start with an ordinary cereal box. I like the ones with big character faces on them the best, but you could use just about anything. Wording sometimes works well, too.

Cut off the front panel. Easy peasy.

Use a plain tile for your base (I buy mine at Home Depot for about 16 cents a piece). Measure your tile (usually about 4 1/4") and cut your cereal box section to match. I like to leave a little bit of the white edge all the way around. It's not a bad looking border and it helps the edges seal better.

Adhere your cutout to the tile using ModPodge. Once that is secure and dry, coat the top with more ModPodge. I like to use the gloss type here to give it a good shine.

The ModPodge will dry clear. Use 2-3 coats to keep the cardboard protected. I then spray the tops with automotive clear coat to make everything waterproof in case of a spill. This takes anywhere from 3 to 7 coats depending on how well the edges get sealed. You don't want any bubbles. Make sure (whether it's ModPodge or clear coat) to let each layer dry fully before adding the next. Otherwise things can get bubbled and ugly.

Adhere little felt pads to each underside corner to keep from scratching surfaces...and you're all done. I do love an easy project!
Thanks to all of you stopping by from A-to-Z Challenge! I love new readers. Make sure to leave me a comment below so that I can return the favor by visiting you.
Hi, I love people who make stuff, and I haven't come across many on the list yet, will definitely be calling back to see your projects.
ReplyDeletethanks for sharing
martine@ silencingthebell
Hi Elle - those are fun! Clever too .. cheers Hilary
ReplyDeleteI love this idea, very creative :)
ReplyDeleteFinley Jayne
http://finleyjaynesbookshelves.blogspot.com/
Does condensation get absorbed into the coaster or does it pool? I made some coasters last year and after I did the protective spray they pool. So I get a mess if I have something sweaty on it and then move the coaster. Looking for guidance.
ReplyDeleteThe condensation does not absorb because of that clear coat protectant. As long as the clear coat is put on flat, the condensation will remain on the coaster. An uneven application can result in the fluid falling over the edges. Without the clear coat, the underlying cardboard will warm and get ruined. It's kind of a hedge your bets kind of project. Sorry I can't provide a clear cut escape for this issue.
DeleteHOARDEEEER!!!!! And I'm saying this because it takes one to know one ;) I LOVE your stuff and I'm mad I can't click on FOLLOW. I will add you to my links then so that it'll be easier to follow your posts :)
ReplyDeleteWhat platform are you using? My follow buttons are on the top right of the blog. I have added new Google Plus and Bloglovin' buttons as of this morning. If there is an additional method you prefer to use, let me know and I'll be happy to add it. Thanks for reading!
DeleteToo cute! and easy.
ReplyDeletehttp://carolsnotebook.com
That is downright creative. Well done! :)
ReplyDeleteSuch darling coasters. And I love the bottle cap ones as well. You are very creative!
ReplyDeleteModgePodge is awesome. Very cute idea!
ReplyDeleteI LOVE this idea! New follower here! I'm stopping by from the "A to Z" and I look forward to visiting again!
ReplyDeleteThank you for the lovely comments and the follows. I appreciate the interest in my projects. Feeling validated here. :)
ReplyDeleteI love this idea. I hope I do it soon :)
ReplyDeletewww.vevisia.com
Very cool! I've been looking for a new coaster idea. And I love your blog ~ can't wait to read more about your crafts!
ReplyDeleteDefinitely Pinning this one! Thanks!
ReplyDeleteJoshisms A to Z
Adorable! Maybe your bottle cap post is so popular because people are also stumbling on it looking for ways to get high while crafting!
ReplyDeleteSo adorable and totally doable too. Lovely
ReplyDeleteSo easy, and kids would love it! Useful post :)
ReplyDeleteDamyanti Co-host, A to Z Challenge 2014, Latest Post
Twitter: @damyantig
#atozchallenge
Glad you all could visit! Happy to know that others like my crafting endeavors.
ReplyDeleteI am so jealous of these.
ReplyDeleteAdding these on my to do list for our Summer Fun Projects! Such fun and perfect for our playroom!
ReplyDelete~ Ashley
These are so cute!!!!!
ReplyDelete