
So my cute friend Erin posted these on her Etsy a few weeks back :
You can find them here.
I decided, "Hey...I'm crafty enough to do these." And so the endeavor began.
A few years back...ok, maybe nearly a decade ago...I painted some letters to put words on the walls of my scrapbook room. At the time sponging was totally in, so I sponge painted them. At the time I loved them. But, now they had taken on the feel of a kindergarten art project. They irritated me - a lot. When I saw Erin's post, I suddenly knew what to do.
This is what they looked like before :


And yes, at the time I did mean to make one have more green and the other more blue. I don't really know what I was thinking. Apparently I don't like things to match - which if you know me at all doesn't make any apparent sense.
So...first things first. I yanked each of these letters out of the wall. They were only nailed in with little penny nails, so it didn't take much effort but I like it to sound like there was some serious physical exertion here. After that I removed the nails from the letters and placed them safely on one of my desks - thus avoiding any future foot puncture wounds during the project.
Once I had them down, I needed to figure out my paper. My scrap room is more or less decorated in lime green, turquoise and tan. So...even though I loved the pink & brown scheme Erin had, I had to find pages that would work with my room. I also had to make sure that the pages I selected were thick cardstock. (This helps to prevent wrinkles when the paper is adhered.)
This is what I ended up with.

I tried to find some more pages that accentuated the tan, but I decided that it would just make the letters look too muted and blah. Instead, I decided just to ink the edges to bring in the brown.
I assembled my tools and got to work on the floor (I have three desks in the room and I prefer the floor...how sad is that.) Paper (obviously), letters (again, duh). Scissors, cutting mat and x-acto knife for the inside edges of letters A and R.

I selected the gloss ModPodge in order to give the letters a little more shine and hopefully make them a little fancier. I also got out my Tim Holtz Distress Ink in Walnut Stain (it's my absolute favorite).
At that point I thought I was ready to work. I was wrong. I started to cut out the paper for the first letter when I realized that one word had blue sides and the other had green sides. I figured out that I would have to paint the edges in order to keep it from driving me nuts later. I chose to use my Making Memories Scrapbook Colors in Chocolate (again, a favorite). I started with the "M" in dream and coated the whole thing up. Then I had an epiphany. I didn't need to paint the entire thing. I just needed enough of the edges to cover where the paper wouldn't be. Thank goodness, because I was getting really sad about using up all of my Chocolate paint. (Side note - if the paint really had been chocolate this project would've been aborted due to sudden lack of supplies.)
 |
| Dumb way: Right side. Smarter way: Left side. |
So I got all the letters painted and sat them in the lid of a Staples box that I had handily in the scrap closet. It was now time to paper. Now...big and important information here: when preparing the paper, trace the letter face side down on to the back side of the paper. I screwed up my first section and then realized this key part of the process.

I divided some letters into three sections and some into two just depending on their shape. No real hard and fast rules. I traced out the paper and then laid it down to make sure everything lined up before gluing. In my case I created angled junctions for the paper. If you look at Erin's example you can see that she used horizontal and vertical junctions. I don't really think you can go wrong here as long as your edges match up in the end. I typically selected one section to be longer than necessary so that there was a little bit of overlap where the sections met.
It was around this time that I lost the cover to my Tim Holtz scissors. FYI - they are wicked sharp. I have been on the hunt for it for the last week to no avail. I'm pretty sure the cats have drug it somewhere. I even got down on my hands and knees in an attempt to locate it. No dice. So now I live in fear for my safety whenever I use anything near them. I'm not kidding. During this project I went to cut a piece of ribbon (you'll see it later) and managed to also slice clean through the edge of a finger. I bled like a stuck pig for about 15 min. But...it was a nice clean cut. Thanks Tim.
But I digress...once I verified the fit of the sections, I inked the edges of each piece. Again, no real rhyme or reason here. I just went to town. The only place I made sure not to ink was the edge of the junction. I wanted the papers to blend somewhat seamlessly.
And now for the messy part. I used the ModPodge to glue each piece onto the letters. Although it was a little messier, I found that if I put the ModPodge directly on the paper rather than on the wood then I got less wrinkling and therefore there was less cursing. I'm pretty proud to say that there was only one letter where I had to peel paper back up. And that was the "M" shown above when I decided that I hated the plain turquoise cardstock and went for a pattern instead.
After adhering the paper, I then coated the letter's front and sides in the ModPodge to seal the edges and add the shine. I laid each letter back in the box as I finished and then added another thick coat of the ModPodge to the top.
 |
| Don't use a surface you care about. This gets messy. |
Once that was done and the adhesive had dried, I decided to gussy them up with some embellishments. I cut some ribbon in the three main colors: lime green, turquoise and brown. I also busted out some minibuttons. I just eyeballed to see where I thought they looked the best and then tied and glued away.
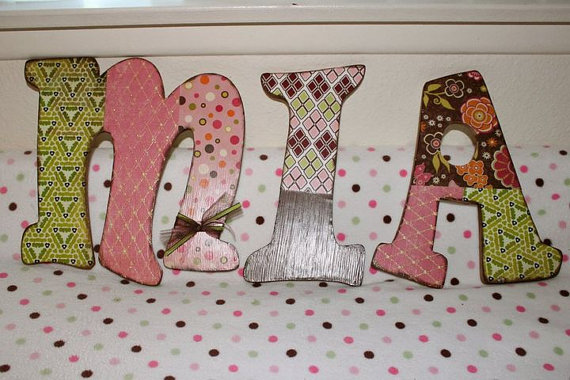
The finished products look like this.


I poked the nails backwards through the previous holes to puncture the paper and slid each letter back into its previous position on the wall.
These are the afters:


 |
| View of the entire wall. |
So there you have it. Messy, but not too hard. All in all I think the project took me about four hours. Not bad considering I had to let both paint and ModPodge dry at different stages.
I think they look much better now. I've upgraded from kindergartener to at least middle schooler. By the way, if any of you see the cover to my scissors, let me know. And it's not in the trash...I already looked there (that's where I found them last time...and yes, this has happened before - don't judge me).
I did these in my kids' rooms. So easy yet they look great!
ReplyDelete