

I'm going to start this post with a little apology. I wrote most of this on my phone/iPad, so the pictures are not of the best quality and some of the composure is weird. Lesson learned. Laziness doesn't pay off people. Also, it sucks to forget to hit save and then lose all of your writing for your post. This result is Take 2. Oops.
Yesterday, Miss M turned 4. She's getting far too big for my liking. But when I asked her a couple of weeks ago if she could just turn 2 instead, she let me know that "little girls grow up, not down". Sad, but true.
 |
| Hitching a ride with Hippo. |
She had a reptile party. We touched and held snakes, lizards, an alligator, and other creepy crawlies. We had a pretty darned good time.

Darian was even brave enough to let Rosie the tarantula hang out on his noggin for a bit.

Since before Miss M was born, I've been making her presents. This tutu was actually originally slated to be a Christmas present, but it got moved up in the production queue.
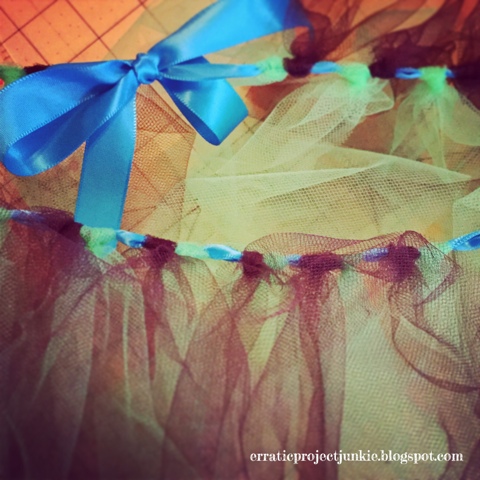
It's not terribly difficult to make and the materials are pretty easy to find. For her tutu, I used around six yards of tulle (turquoise, lime green, royal blue, and brown), some ribbon (turqoise, lime green, royal blue), and some felt (turquoise, lime green, royal blue, and brown) along with my glue gun.
I cut the tulle into 3" wide strips at about 28" in length. I also cut 4 strips in each color at about 56" long in order to create a "tail" at the back of the tutu.
In the past, when I've made the girls' tutus, I've made the waist using elastic. This time, I wanted it to be adjustable in size, so I used a ribbon. The tulle can be slid along the ribbon to either make the tutu larger or smaller, as needed. I cut the ribbon fairly long so that it can be tied in a bow in back. At the length I used, she should be able to wear it until she's a teenager if she sees fit.
I slid the tied ribbon up my leg, and added strips of tulle as I spun it around, keeping the colors sequenced to prevent color bunching. The tulle strips are attached by folding them in half and then wrapping the ends around the waist ribbon and back through the loop created at the fold. When pulled tight, they will snug up around the waist ribbon.

I continued this process through about half a season of Glee. The result was a very poofy tutu skirt.
Next, I needed to add tail feathers. I did this by combining inspiration from Andrea's Notebook and the picture I took of a peacock feather replica at JoAnn Fabrics.

I cut out my felt pieces and started layering them using my glue gun. I then added additional feather detail by sewing with embroidery floss from the lime green layer to the edge of the brown. (To keep the project 100% no sew, you can either skip this step or glue on strips of felt.)

I added some pieces of peacock colored fiber to the backs of the feathers to give them a little more flair.

I cut lengths of the turquoise ribbon in varying sizes to help me attach the feathers to the tutu. They were glued on to the back of each feather and then added to the tutu. I looped the feather ribbon around the waist ribbon and glued the end of the feather ribbon to itself, leaving a small open loop that would allow the feather to slide along the waist as the size is changed. Additional feathers were added by gluing their ribbons to the backs of the top feathers. This created a layered feather tail that would extend the full length of the tulle tail.
 |
| Checking out her tail in the mirror. |

This one was a fun project. I'll definitely be making more of these in the future.
You have such a cute family! And I always like what your creative mind whips out. I just wish that I can follow you through Wordpress or even through email so I can be updated with your posts. I do have a Twitter account but for the life of me, I never get to like it and the only reason I get to post there is through linking with my Wordpress. Now my Facebook account is normally for more personal stuff...Maybe it's time to create a new account for purposes such as this. Hmnnn.....
ReplyDeleteAnyhoo, I still get to visit here once in a while, good thing I have a link in my site.
Keep doing what you do, Miss Elle!!!
Thank you!!! Good news! You can follow by email. If you scroll to the top, there are some buttons on the right side pane. The green envelope will allow you to register for email delivery via FeedBurner.Thank you SO MUCH for adding me to your "Blogville". :)
Delete