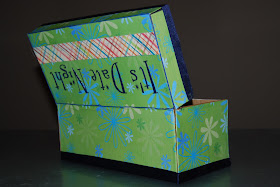
So...I came up with the idea of the date box.
In part one, I gave you 160 ideas for some fun (and maybe kind of quirky) ideas for a few good date nights. This time, I'm going to show you my pretty little container. We all need something pretty.
Don't worry though...I kept it in man-friendly colors. We both have to be happy with it, right? I'm so thoughtful and nice.
I started with something kind of boring, but still something that I love...
Yep, it's just a shoe box. But this is one of my favorite shoe boxes. Why? Because the shoes that came in this box are A-W-E-S-O-M-E. They are probably the most comfortable shoes I've ever worn. I love them.
See...cute, right? You need these shoes. Seriously. They're comfortable, they're pretty decent for easy hiking and they are awesome in water. (I wore them when we went to the beach on our summer vacation and they did great for climbing around the tide pools.) Even better? They're not that expensive. I found mine on sale for around $20. I love a good deal.
I may have gotten a bit off track there. How about we go back to the task at hand?
So...I took my freakin' wicked shoe box and measured out some patterned paper to fit. I started out by using my ModPodge to adhere the paper to the box, but it really just irritated me. The edges wanted to fold up all over the place. I wound up bust out good ol' reliable, Elmer's glue. Hey...if it's good enough for the judges on Craft Wars to praise, it's good enough for me.
It was a multiple stage process that required a lot of patience. I'm bad at patience. I glued in about five stages. First was just getting the paper on each side. Some of my measurements weren't uber precise, but I had some plans...
Once the paper was on, it was time to do a little embellishing. I added the decorative strips across the bottom and the lid. Next, I went to work bending the corners in and adhering some fat blue ribbon from my scrap stash. I love it when trash becomes treasure.
Opening and closing the lid seemed to be causing some issues at this point and the paper was bending on itself, so I trimmed the paper with an X-Acto knife and instead lined the back seam with some embroidery floss. It's not perfect, but it does allow a little more flexibility in the open/close without revealing too much of the cardboard underneath.
Last, but not least...it wouldn't be a project without a little OCD...everything needs a label. I busted out the Pazzle and cut myself some letters from blue cardstock. I adhered them using my Xyron and then fancified it all with a nice coat of glossy ModPodge.
It's not super fancy, but I like it. Even better, I like the wonderful things that it will hold...stay tuned for part three, where I show you the individual cards and the final project all put together.
This post is part of my 31 Days of Creative Crafting series. Click here to see part 1 of "Take Me Out Tonight" and get 160 ideas for your own date night.


No comments:
Post a Comment